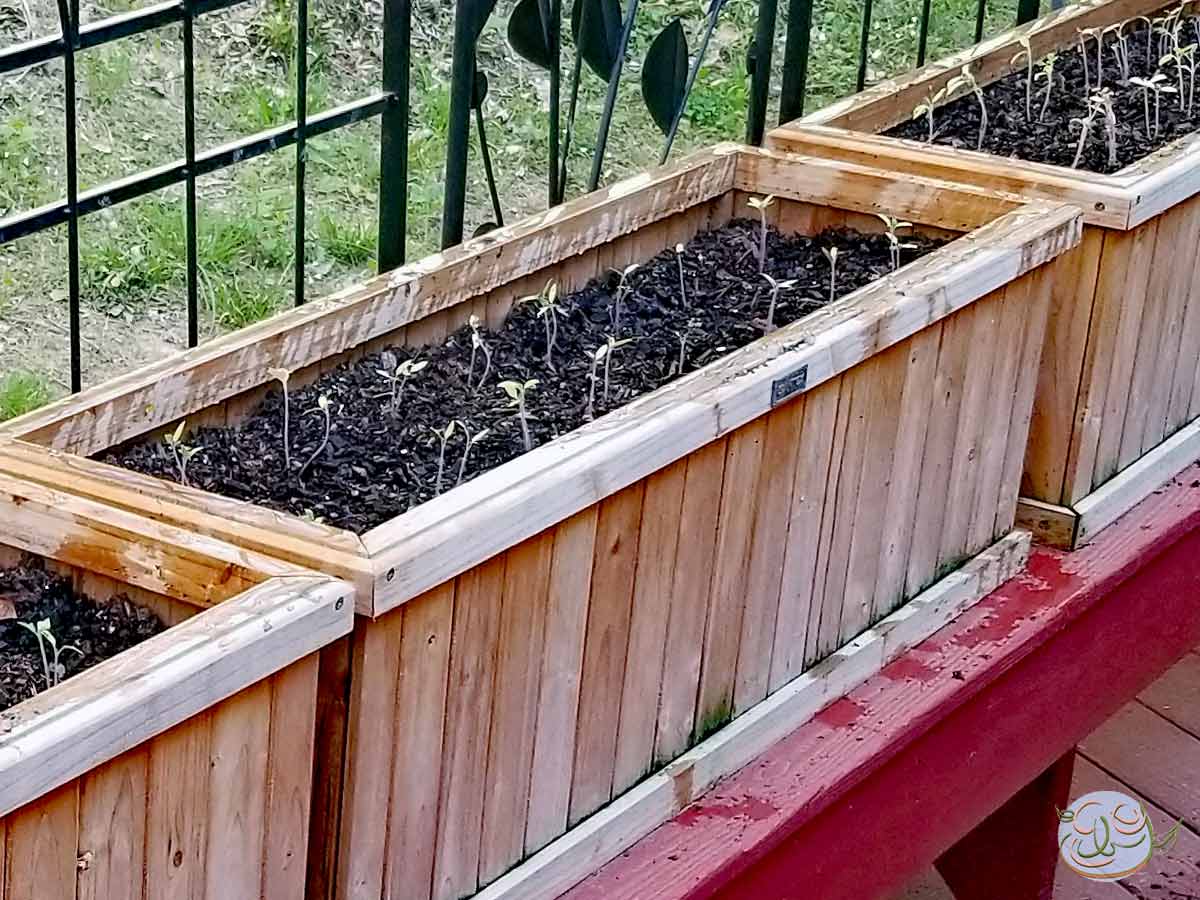
Two months ago, I published my 5 Step Guide to Spring Garden Planning. Following along with that plan, about seven weeks ago, we started our seeds indoors. Now, finally, spring planting time is here! It’s time to transplant our seedlings from their cozy seed starters and give them new homes in the great outdoors. In our case, because we don’t have much land to plant directly in-ground, we’re transplanting in raised beds and containers off of our back porch.
Whether in a raised bed, a container garden, a pot, a planter, or in-ground, moving seedlings from indoors to outdoors does involve a small amount of risk to the delicate plants. But seedlings started indoors can’t live their whole lives in seed starter. They need room to grow and different nutrients to sustain them and help them reach their full potential. Transplanting them right to start with ensures a healthy garden and happy plants.
Before Transplanting
When to Transplant Seedlings
Ideally, seedlings should only stay in small trays or pots for 3 to 4 weeks. The absolute maximum amount of time seedlings should stay in their seed starters is 8 weeks. Leaving seedlings in their starter soil for longer than that harms the roots and can stunt the plant’s growth for the entire season. This limits their potential production of fruits and vegetables, which means less food for your table. If the weather isn’t cooperating (and it sometimes doesn’t!), you may need to transplant into slightly larger pots with better soil until the weather warms enough at night.
If you’re using soil blocks, adding additional soil to your growing seedlings is a breeze. You can read all about the soil blocking method in this article.
How Big Should Seedlings Be?
Seedlings should be about 2 to 3 inches tall and have at least two secondary leaves before you transplant them. This means that they’ve been growing in their starter soil for at least 3 weeks.

Ideally, you should harden off your seedlings, which helps to thicken their stems. Once your seedlings have started producing secondary leaves, watch the weather for some idyllic spring days to start this process.
On days when it’s warm and not too windy, bring your seedlings outside. Set them in a flat space like a patio table or chair where they won’t be disturbed by gusts of wind, visiting wildlife, or curious pets. After an hour or two, bring your seedlings back inside to avoid the cooler nights. Do this as many days as you can while you’re waiting for the spring nights to come above freezing.

What Should the Temperature Be?
Keep an eye on the temperature every day in the spring to know when it’s safe to plant your seedlings outside. Seedlings are more delicate than established plants and can’t handle temperatures lower than freezing (32 degrees Fahrenheit, 0 degrees Celsius). When you’ve had a full week of nightly temperatures above freezing and no freezing temps in the 10 day forecast, you can consider planting outdoors. The Online Farmer’s Almanac can give you some idea when you can plant outdoors in your area, but their data is generic. It doesn’t take into account your local environment like elevations or water features significant to your area. Nothing substitutes for your own experience.

We had intended to plant our garden last week, but the weather threw us a curve ball to the tune of a late spring freeze warning. This just goes to show you that you should always check the 10 day weather forecast. When the forecast is no longer waffling between winter and summer every day, you can feel confident that it’s time to plant seedlings outside.
How to Prepare Soil to Transplant Seedlings
Now that your seedlings are ready to move, they need a good home to go to. Preparing the soil before you transplant is an absolute must. What you add to your soil will depend on what and where you’re planting. Different plants need different kinds of nutrients to produce their best. For example, tomatoes need plenty of calcium and phosphorous to avoid a whole host of common tomato problems, including blossom rot and verticillium wilt.
We’re planting a lot of tomatoes in our raised beds. So, to make sure our tomatoes get plenty of calcium, we added extra calcium to the soil. Extra calcium is easy to add if you save your eggshells from the kitchen.

We also added fertilizer to raise the phosphorous level. Compost made with bananas is also an excellent source of natural phosphorous. Do some research before you transplant to find out what your plants need to do their best.
Should You Water Before Transplanting?
You should water your seedlings before transplanting them. This will prepare them for moving day. Watering helps the soil to stick around the seedlings’ young roots as you move them from their tray to their forever home.
During Transplanting
What Should the Weather Be Like when Transplanting?
If you can help it, don’t transplant your seedlings in direct sunlight. Wait until the heat of the day has peaked. Planting in direct sunlight will dry out your soil (and your seedlings) faster, and make it harder for them to recover from transplant shock. (More on transplant shock below). Don’t transplant in the rain, either, or your seedlings will get squashed by the raindrops. Seedlings just transplanted won’t have a firm root base to hold themselves up against the elements for a day or two. Cloudy days are ideal for planting seedlings as it’s generally not as hot and the diffused sunlight will still give the seedlings enough light to take in their little secondary leaves.
Should Plants Be Dry When Transplanting?

Your seedlings’ soil should still be wet when transplanting. This avoids possible damage to their young roots by providing a little bit of cushion during the process. Likewise, the soil you’re transplanting into should be slightly wet, but not soaked, when you transplant seedlings. Soil that’s too wet starves the roots of air. A lack of airflow will slow your plants’ recovery from transplanting.
How and Where To Hold A Seedling When Transplanting
Seedlings are very delicate and should be handled with care at all times, especially when transplanting.

Hold the stem of the seedling close to the top of the soil gently between your thumb and forefinger. I like to cradle the plants’ stem between the first knuckles of thumb and forefinger and let the leaves fall where they may. This stops you from crushing the leaves while removing the plant from the pot.
To remove the seedling from its container, a gentle tug upward will often pull your seedlings free. You can also cut away each section of your seed tray so you’re only dealing with one compartment at a time. This way, you can turn the small pot over and give it a couple of taps on the bottom to release the plant. Once removed from its container, your middle, ring, and little fingers can cup around the roots and soil mass. This will allow you carefully transfer the seedling from its seed tray to its waiting raised bed, container, or garden soil.
If you have more than one seedling in a compartment or container (as we did), their roots may be intertwined. You may have to separate the roots of the seedlings from one another before you plant them. Hold your multiple seedlings between your thumb and forefinger of both hands to stabilize the seedlings as you remove them from the pot. Then, lifting with both hands, use your remaining fingers to gently tease the roots apart. You will lose some cushioning soil from around the roots, but you will be able to transplant your seedlings far enough apart.
How Far Apart to Plant Seedlings

Most seed packets will tell you how far apart to transplant certain kinds of plants. This is generally a good rule of thumb. How far apart plants should be depends on how much space you have and what kinds of plants you’re planting. You can plant tomatoes, peas, peppers, cucumbers, beans, and many other spring-sown vegetables fairly close together. Their fruit is above ground and you can trellis the plants to separate them as they grow. Squash and melons need more space and should be planted much further apart in ground or raised beds, or in separate containers in a container garden. Root vegetables need space below ground to grow their bounty. Plant your garden with your mature plants in mind while they’re still seedlings.
After Transplanting
Should You Water Seedlings After Transplant?

You should water your seedlings immediately after planting and daily for a week or two after planting. After that, unless your weather is exceedingly wet or hot, you should water every other day. This will help to establish healthy roots that can equally take in water, oxygen, and nutrients to support your growing plants.
If you get a lot of rain after you transplant, you won’t need to water as much. Conversely, if your weather turns warm quickly, you may need to water a couple times a day if you’ve just transplanted seedlings. Recently transplanted seedlings need water to pull in the nutrients required to establish a good root base.
Transplant Shock: What Is It and How To Avoid It
Transplant shock occurs whenever you move a plant from one location to another. This may be from a seed tray to a raised bed or in-ground, or even just repotting. When you disturb a plant’s roots, the plant no longer has the support of the soil around it. This causes a recently transplanted plant to wilt and even fall over.
You can support your recent transplant with sticks like bamboo skewers or even with small cages if the plant is big enough. But such outside support isn’t necessary for the most part. Transplant shock only lasts a few hours to a day. Succulent plants like basil and tomatoes spring back more quickly than others due to larger vascular veins in their stems (called xylem in biology).
How Soon After Planting Should You Fertilize?
You can give recently transplanted seedlings a mild fertilizer a day or so after you transplant them. But don’t overdo it! Many fertilizers can be harsh to small plants and may burn their roots if the solution is too strong. If you’ve prepared the soil bed well before hand, as I have recommended, fertilizer is a good secondary step a day or two after transplanting. Making sure there’s enough water to dissolve the nutrients already in the soil is the key.
Recap: 8 Steps in Transplanting Seedlings
- Wait until your seedlings have established secondary leaves and are 2-3 inches tall.
- Make sure your 10 day weather forecast shows no freezing weather.
- Prepare your garden soil by fertilizing it before you transplant.
- Water your seedlings and garden soil well before transplanting.
- Hold your seedlings carefully during the transplanting process.
- Plant seedlings far enough apart to give mature plants room to grow and produce fruit.
- Water directly after transplanting, and every day for a week afterward.
- Fertilize your plants with a diluted solution 1-2 days after transplanting.


5 responses to “Transplanting Seedlings Outdoors”
[…] have previously written about how important it is to prepare your soil bed properly when transferring seedlings outside. This means giving them the proper nutrients right off the bat so they’ll have what they need […]
[…] in your soil, then your plants won’t be able to utilize it. When you’re planting seeds or transplanting seedlings in the spring, make sure your soil has enough calcium. You can add calcium to your soil naturally (see below) and […]
[…] My local library held a seed swap on National Seed Swap Day. One week later, a local garden magazine held their annual seed swap in my state. I got the opportunity to attend the latter. Gardeners from all over the local area spent a wonderful, sunny afternoon together sharing stories about our gardens, seeds, and listening to expert presentations on seed starting and transplanting those seedlings outside. […]
[…] don’t like to sit in the flimsy plastic pots nurseries ship them in. You’ll want to transplant them into your garden shortly after you receive them and as soon as they’ll be safe from […]
[…] indoors, only to be thwarted by a late spring frost. In fact, I had this very problem last year when I was ready to transplant my seedlings outside. Not only does a late spring derail plans, but it means the seedlings continue to grow while you […]